




Verify a B2B email list and route each result before cold outreach.
You already have the spreadsheet. The names, companies, and work emails look plausible—but that does not mean every row is ready for a cold-outreach campaign.
The practical job is to verify the email addresses, separate clear results from uncertain ones, and preserve enough contact context to decide what should happen next. Verification is useful because it helps route records. It is not a guarantee of delivery, relevance, consent, or reply.
Quick Answer
Before cold outreach, keep the person, company, source, and record ID attached to every email, remove exact duplicates, and run the list through a bulk email verifier.
Suppress addresses returned as invalid. Keep valid addresses for a final identity and relevance review. Isolate risky, catch-all, and unknown results instead of mixing them into the main send; those records may need another source, a later recheck, or manual research.
Do not treat verification as the entire launch gate. A valid address can still belong to the wrong person, and a technically usable mailbox does not prove that the message is lawful, relevant, authenticated, or likely to reach the primary inbox.
What Email Verification Can—and Cannot—Tell You
Most email verification relies on two core checks: the domain's MX records and the receiving mail server's SMTP response. The MX lookup confirms whether the domain is configured to receive email. The SMTP-level check provides stronger evidence about how the server responds for the address. Providers may add supporting signals such as address format, disposable or generic mailbox patterns, likely typos, catch-all behavior, and temporary errors.
The result is still an interpretation of available technical signals. Mail servers do not all respond in the same way, and some intentionally avoid giving a conclusive answer. That is why providers may use different labels or classify the same uncertain address differently.
Verification can help you identify obvious failures and separate stronger results from weaker ones. It cannot prove that:
- the person still works at the company;
- the role is relevant to your offer;
- the mailbox belongs to the person you intended;
- the recipient expects or wants the message;
- your sending domain is properly configured; or
- the message will be delivered, placed in the inbox, or answered.
That boundary matters. If a team turns every “valid” result into an automatic send, it may solve the mailbox problem while keeping the targeting problem.
Prepare the List Before You Verify It
Do not upload a column of email addresses with no context. Keep the fields that will help you review and route each result afterward.
At minimum, preserve:
- email address;
- person name;
- company name or domain;
- current role, if available;
- source and last-updated date, if available; and
- an internal record ID.
Remove exact duplicate rows before verification, but do not merge different people simply because they share a company domain. Keep your original source columns so that uncertain results can be researched later.
It also helps to create an empty action field—such as Keep, Suppress, or Review—before running verification. The verifier provides evidence; your routing rule turns that evidence into an operational decision.
What Does an Email Verifier Actually Check?
An email verifier is trying to answer a practical question: is there enough evidence that this address can receive mail?
The two core checks are usually:
- MX records: Does the domain publish a working mail destination, showing that it is configured to receive email?
- SMTP response: How does the receiving mail server respond during an address-level verification check?
An MX record only confirms that the domain has somewhere to receive mail. It does not prove that Alex's individual mailbox exists. The SMTP response provides stronger mailbox-level evidence, but it may still be inconclusive when a server blocks verification, times out, or accepts every possible address on a catch-all domain. A verifier can perform this check without sending the prospect a marketing email.
Address format, disposable or generic mailbox patterns, likely typos, catch-all behavior, and temporary errors are supporting signals. In the returned file, focus on three things: the overall result, the plain-language reason, and when the check happened.
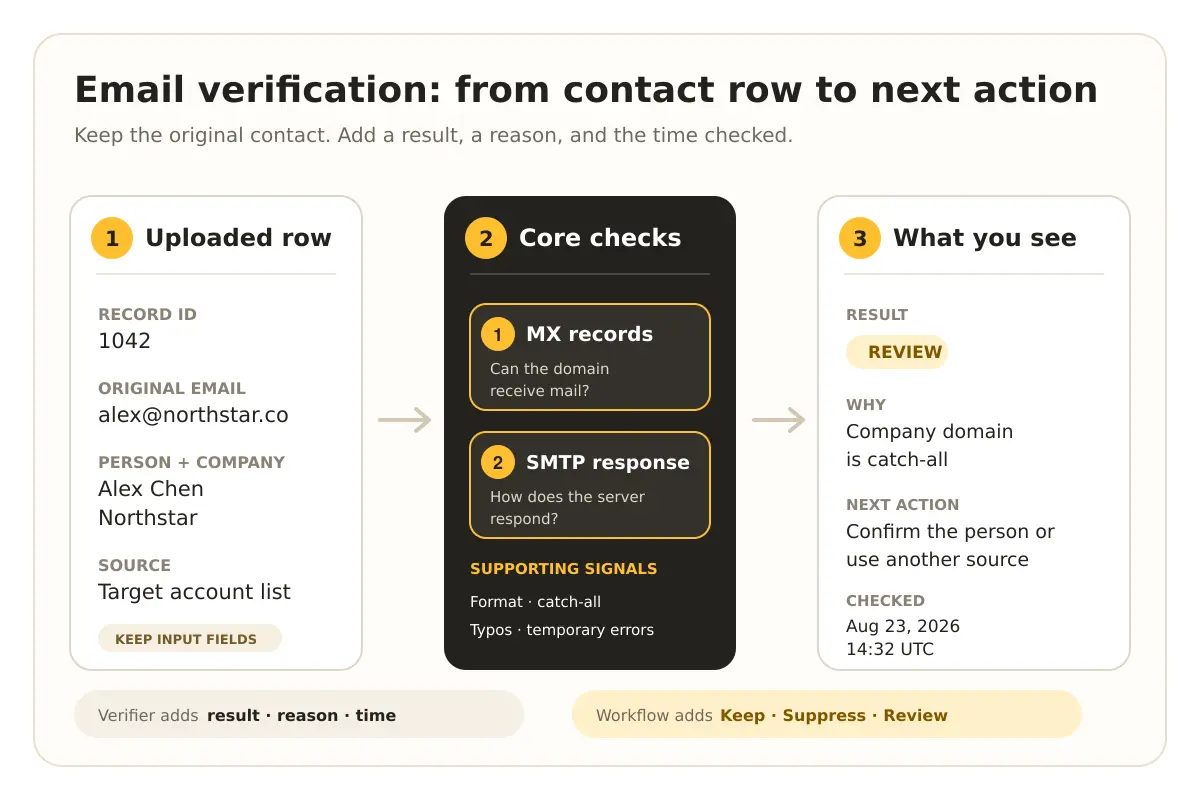
Figure 1. MX records and the SMTP response inform the result; your workflow uses the reason and checked time to choose the next action. Field names vary by provider.
What Will the Returned List Look Like?
The output should look like your original contact list with a few useful columns added. It should not return a separate column of email addresses that you then have to match back manually.
Table 1. The Five Columns You Need in the Returned List
| Column to look for | Example | How to use it |
|---|---|---|
| Original contact | Alex Chen · Northstar · alex@northstar.co | Know which person and company the result belongs to |
| Result | Valid, Invalid, Review, or Unknown | Get the short answer for this address |
| Reason | Mailbox not found, catch-all domain, or server unavailable | Understand why the address received that result |
| Checked time | August 23, 2026, 14:32 UTC | Judge how recent the evidence is |
| Next action | Keep, Suppress, or Review | Decide what should happen to the record next |
For example, Alex’s result might say Review because Northstar uses a catch-all domain. That does not prove Alex’s mailbox exists, so the next action is to confirm the person and address from another professional source—not to place the record directly into the main send.
Different tools use different column names. The label may be status, result, or email_status; the explanation may be called reason or sub-status. The wording matters less than whether a non-technical user can answer: What happened to this email, why, and what should I do next?
The first row comes from your uploaded list. The verifier adds the result, reason, and checked time. Your team or automation adds the next action.
How to Route Each Email Verification Result
Status names vary by tool, but most results can be understood through five practical buckets. Use the provider’s own documentation when applying its labels, then map them into a simple internal policy.
Table 2. How to Route Each Email Verification Result
Valid
The verifier found stronger evidence that the address can receive mail
Keep for contact review
Confirm the current person, company, role, and campaign relevance
Invalid
The address failed one or more decisive checks
Suppress from outreach
Correct a known typo only when another reliable source supports the change
Risky
The result carries elevated uncertainty or a provider-specific risk signal
Keep out of the main send
Review the stated reason and seek another source or verification signal
Catch-all / Accept-all
The domain may accept messages without proving the individual mailbox exists
Treat as uncertain
Confirm the person and address using additional professional evidence
Unknown
The verifier could not reach a confident conclusion
Queue for recheck or research
Re-verify later or use another supported source
The table is a default routing framework, not a universal definition. One provider may group catch-all under risky; another may return it separately. A temporary server timeout may appear as unknown even when the address later becomes verifiable.
The important practice is consistency. Document what each provider label means in your workflow, then apply the same routing rule across the campaign rather than making ad hoc decisions row by row.
A Valid Email Is Not Automatically an Outreach-Ready Contact
Once an address passes verification, return to the person behind the record.
Check whether the person still works at the company, whether the role is current, and whether that role is connected to the problem your product solves. A valid address for someone who left six months ago is still poor campaign data. So is a valid address for a senior executive with no plausible connection to the buying problem.
Also check where the record came from and whether your planned use is appropriate for the relevant jurisdiction. In the United States, the FTC’s CAN-SPAM compliance guide requires accurate sender information, non-deceptive subject lines, a physical address, and a clear opt-out mechanism for commercial email.
In the United Kingdom, the ICO’s B2B marketing guidance explains that data-protection rules can still apply when a business contact is identifiable.
Verification does not replace those obligations. It only answers one part of the readiness question.
For a broader review across email, phone, CRM hygiene, consent, and routing, use the Contact Verification Checklist for Outbound Teams.
What Should You Do With Catch-All, Risky, and Unknown Records?
Uncertain does not automatically mean worthless, but it should not be treated as confirmed.
A catch-all domain can accept mail for many possible addresses, which makes a successful server response weak evidence that a specific person’s mailbox exists. A risky label may reflect catch-all behavior, a disposable address, a provider-specific warning, or another condition. Unknown often means the verifier could not get enough information at that moment.
Keep these records in a separate review segment. For a high-value prospect, look for a current professional profile, a second contact source, recent first-party interaction, or another reliable link between the person and the address. Re-verify when the previous result may have been affected by a temporary response.
If the team chooses to test uncertain addresses, define a controlled policy outside the main valid segment. The decision should consider the value of the prospect, the reason for uncertainty, the quality of the source, the sending setup, and the team’s tolerance for risk. Do not turn “risky” into “send anyway” by default.
When a record needs additional data sources and clear stopping rules, the Waterfall Enrichment Workflow provides a broader operating model.
When Should You Re-Verify a B2B Email List?
There is no single verification interval that fits every list. A fresh, first-party contact file and an old purchased export do not carry the same uncertainty.
Use campaign events and data changes as triggers. Re-verify when:
- an older list is about to enter a new campaign;
- job titles or company records have been refreshed;
- dormant contacts are being reactivated;
- the previous result was risky, catch-all, or unknown;
- the source or last-updated date is unclear; or
- a campaign has revealed unexpected data-quality problems.
Re-verification should not become a ritual that repeatedly spends credits without changing a decision. Run it when the result can affect whether a record is kept, suppressed, researched, or moved into outreach.
What First Value Should Look Like
A useful verification workflow should return more than a cleaned column. It should give the SDR a reviewable result tied to the original record.
Before moving forward, you should be able to see:
- the original email and contact identity;
- the verification status;
- the reason or confidence context, when available;
- the record’s source and recency context;
- the routing decision; and
- which records require enrichment, suppression, or further review.
Lev8’s Email Verifier supports bulk email verification and returns results for review before users move selected contacts forward. The exact labels and available post-verification actions may change with the product interface, so follow the current on-screen status definitions rather than assuming every verifier uses the same taxonomy.
The first value is not simply “the file finished processing.” It is a smaller, explainable list in which confirmed failures are suppressed, uncertain records are isolated, and stronger contacts remain connected to the people and companies they represent.
What’s Next
Verify the list, separate certainty from uncertainty, and let only reviewed records move toward outreach.
If you already have a B2B email list, use Lev8 to check the records in bulk and review the returned results before sending.